While waiting for the HP cylinder boring to finish, I decided to take a set of panoramic shots of the workshop to prove that it doesn’t take flash new machinery to build stuff…
The Lathe
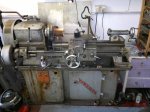
The Lathe- an early L5. This is an early “Mark2” Harrison L5, built in around 1947/6, it serves me very well.
It’s a 4.5 inch centre height, but a large removable gap-bed means you can swing some pretty big stuff! The all-geared head (and more importantly the clutch drive) make it a real pleasure to use – the speeds are a bit slow for inserted tooling, but I have been waiting for the motor to pack up for about 25 years now, so I could replace it with a faster one!
The only downside is that the bore in the headstock is only 3/4″ so a bit restrictive. Also (I now realize) that it has an L5A top slide, which made fitting tools really hard; earlier in my relationship with it I made a set of dog-leg tool holders to bring the tool bits down to the right level, but in the end I milled the top off the slide, and put a far-east “piston style” quick-change holder on it. While this makes the slide look a little thin, the machine is so massivly built that it casued no problem – parting off steel at top spindle speed is still de-rigeur!
It comes with an ABC feed gearbox, so it’s still juggling with change wheels when screw-cutting, bit no problem really… I think it’s a long-bed version (I’ve certainly seen shorter ones). I recently bought a 3Morse ER20 collet chuck for it – and this really improved things.
When I first got it the headstock Timken bearings were not “great” and on stripping it there was some galling on the spindle – new matched bearings were a lot of money (£200+ in 1980), so it got a pair of “less matched” ones, and some carefully attention with a swiss file – this probably explains the imperfect finish you get (slight patterning) – but hey ho…
When I first got the lathe the chuck was so firmly fitted I actually knocked a couple of teeth out of the change wheels, when I tried to lock the headstock by putting a wooden block in between two change wheels :-(… but repaired the broken teeth by just milling a slot in the wheel and brazing in a mild steel block, and filing it to shape – still working 20 years later, and it doesn’t even tick as it’s running now!

- The Lathe, Shaper and Mill
The Shaper
I’ve always loved shapers, probably as a result of the old Boxford? at school and it’s rythmic noise and motion triggers the same neurons as does the dance music I love today! Firstly I got an old Drummond hand shaper – a quaint piece of Victorian Engineering, but attempt to tackle any thing too big, and it was major arm-ache time!
So I snapped up a Rhodes 7-inch shaper, that I believe arrived as part of the US lend-lease program in the late 40’s. Manufactured in Hartford Connecticut, it’s a nice little machine. It lost its counter-shaft drive, so it only has a single speed, via an nonadjustable and ancient and decomposing v-belt. (replaced now with a tensioner and a new belt!)
The Mill

The Adcock/BridgePort mill with DRO
This has a chequered history. The original is a Adcock & Shipley 1AD? from 1954. This was donated to me by a machine shop in Runcorn, who just wanted to be “rid of the thing” – so I donated a fiver to their beer fund, and the deal was done. I replaced the 3-phase motor with a Clarke 3HP single phase thing (Which exploded within 45 mins of first use – sadly about 3 years after fitting it, so no warranty there!) So Farborough Rewinds provided the biggest single phase motor I have ever seen, and this got the machine running…..
I “learnt my trade” with this horizontal mill, but yearned after a vertical machine… then ME (Model Engineer) had a man selling Bridgeport J-type milling heads – so £750 and the deal was done!! I mounted it on the overarm of the horizontal machine with a set of straps fitted into the knee v-ways to hold it in position… this was 3-phase, so I purchased a converter from Transwave (the one with the motor in to allow one to run small motors too) and this has performed well.
The final upgrade was to build and fit a DRO. I built a shumatec DR350 and fitted “glass scales” to the table, and a cheap “vernier style one” to the quill feed… this changed my life! I cannot believe how much this speeded things up – on a par with the ER20 collects on the lathe!


